- Messages
- 541
- Location
- West Midlands
I bought a Wilkinson Sword Empire a little while ago because they looked so dam cool, I knew they used a proprietary wedge blade so it was my intention to give it one try and then make a display piece out of it. Unfortunately the strop was missing and the wedge blade was a duffer:icon_sad:
I finally got around to cleaning it the other day and it's come up pretty good, these things were really built to last and have a great Steam Punk look about them.
Whilst I was cleaning and examining it I wondered if a regular GEM SE blade would fit, but alas no:icon_mad: Well being a stubborn OCD type of person who likes to tinker I had a think and I've managed to get SE blades to fit.
So for all you souls out there that have one of these, I thought I'd share the process in case you want to give it a go. It's not very hard to do and you end up with a fully functional adjustable SE razor, that doesn't need stropping.
The only tools needed are a small pair of needle nose pliers, some sharp side cutters and an engineer's scribe (a small thin flat bladed screwdriver would also suffice).
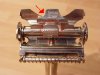
First you move the release catch to the left (as you look at it from the front) circled in the picture below, this will allow the blade holder to open (blade holder is what I've called the bit with ‘THREAD STROP THIS SIDE' on it.
[attachment=3701]
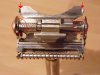
The picture below shows the blade holder now open, I've also highlighted the problem areas that stop a regular SE blade fitting. The arrowed parts show where the edge of the blade will go and if you follow this line down you will come to the circled parts of the mechanism which stop the blade going in fully, as these are closer together than the width of a regular SE blade.
[attachment=3702]
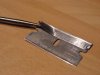
Now the dangerous part, removing the spine from the SE blade:icon_eek: please be careful these things are to coin a phrase ‘Razor Sharp'. I used an engineer's scribe to prise one corner up, but you could probably use a small flat blade screwdriver here. Once one corner is up, it's easy enough to pull the spine off.
[attachment=3703]
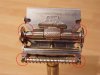
Now the spine is of you'll see why the areas circled in picture 2 cause a problem. A regular SE blade without the spine is squared off at the corners and these corners hit this part of the mechanism and stop the blade from going in. So out with your side cutters and nip the corners off.
[attachment=3704]
Insert the blade as far as it will go, if it doesn't go all the way to the bottom take your scribe or flat bladed screwdriver and just open the gap up a little, re-insert the blade, close the blade guard, slide the release catch back to the right and you're almost done. You can see in the next picture how cutting the corners off the blade allow it to now fit in all the way.
[attachment=3705]
Flip the blade over and your last job involves what I've called the locating lugs. These are shown in the picture above (lower set of circles), these lugs hold the blade in place and keep tension on it.
Initially your modified SE blade will sit on top of these lugs, so push the adjuster screw forwards (this moves the spring loaded blade tray forward, as originally designed) and the blade now slips under these lugs. You may or may not need to do this stage (I had to only do one side) get your needle nose pliers and bend these lugs outwards ever so slightly. This is because you want the lugs to be on the very corner of the blade (you don't want an exposed corner of the blade). Go easy they only need moving a tiny bit, just enough to allow the blade corner to fit under them and (that's) it.
Congratulations, you're done. Adjust the screw at the back to wind the guard roller in or out to your preference (I'd suggest setting it to mild for your first go), whip up a lather and away you go.
I hope this may inspire someone else to give it a go and bring some life back to a beautiful razor that wasn't getting used. What have you got to loose (except a finger).
I take no responsibility for anyone cutting themselves to ribbons when following this tutorial. If you are not safe with sharp things please get an adult to help:icon_lol:
I finally got around to cleaning it the other day and it's come up pretty good, these things were really built to last and have a great Steam Punk look about them.
Whilst I was cleaning and examining it I wondered if a regular GEM SE blade would fit, but alas no:icon_mad: Well being a stubborn OCD type of person who likes to tinker I had a think and I've managed to get SE blades to fit.
So for all you souls out there that have one of these, I thought I'd share the process in case you want to give it a go. It's not very hard to do and you end up with a fully functional adjustable SE razor, that doesn't need stropping.
The only tools needed are a small pair of needle nose pliers, some sharp side cutters and an engineer's scribe (a small thin flat bladed screwdriver would also suffice).
First you move the release catch to the left (as you look at it from the front) circled in the picture below, this will allow the blade holder to open (blade holder is what I've called the bit with ‘THREAD STROP THIS SIDE' on it.
[attachment=3701]
The picture below shows the blade holder now open, I've also highlighted the problem areas that stop a regular SE blade fitting. The arrowed parts show where the edge of the blade will go and if you follow this line down you will come to the circled parts of the mechanism which stop the blade going in fully, as these are closer together than the width of a regular SE blade.
[attachment=3702]
Now the dangerous part, removing the spine from the SE blade:icon_eek: please be careful these things are to coin a phrase ‘Razor Sharp'. I used an engineer's scribe to prise one corner up, but you could probably use a small flat blade screwdriver here. Once one corner is up, it's easy enough to pull the spine off.
[attachment=3703]
Now the spine is of you'll see why the areas circled in picture 2 cause a problem. A regular SE blade without the spine is squared off at the corners and these corners hit this part of the mechanism and stop the blade from going in. So out with your side cutters and nip the corners off.
[attachment=3704]
Insert the blade as far as it will go, if it doesn't go all the way to the bottom take your scribe or flat bladed screwdriver and just open the gap up a little, re-insert the blade, close the blade guard, slide the release catch back to the right and you're almost done. You can see in the next picture how cutting the corners off the blade allow it to now fit in all the way.
[attachment=3705]
Flip the blade over and your last job involves what I've called the locating lugs. These are shown in the picture above (lower set of circles), these lugs hold the blade in place and keep tension on it.
Initially your modified SE blade will sit on top of these lugs, so push the adjuster screw forwards (this moves the spring loaded blade tray forward, as originally designed) and the blade now slips under these lugs. You may or may not need to do this stage (I had to only do one side) get your needle nose pliers and bend these lugs outwards ever so slightly. This is because you want the lugs to be on the very corner of the blade (you don't want an exposed corner of the blade). Go easy they only need moving a tiny bit, just enough to allow the blade corner to fit under them and (that's) it.
Congratulations, you're done. Adjust the screw at the back to wind the guard roller in or out to your preference (I'd suggest setting it to mild for your first go), whip up a lather and away you go.
I hope this may inspire someone else to give it a go and bring some life back to a beautiful razor that wasn't getting used. What have you got to loose (except a finger).
I take no responsibility for anyone cutting themselves to ribbons when following this tutorial. If you are not safe with sharp things please get an adult to help:icon_lol: