Pinning

Messages
782
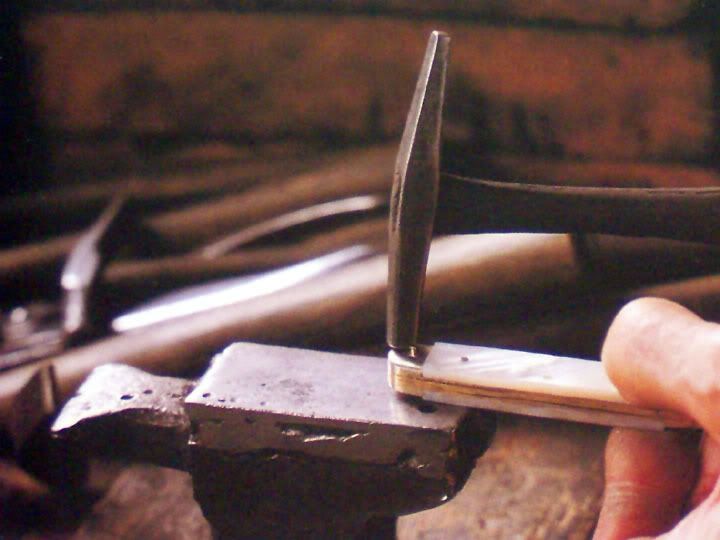
OK - I have a couple of restoration projects ready to re-pin. The original pins I bought from Olivia's Seif are too big for the first one (the razor is a 3/8 Puma), so I ordered some brass rods and size #0 brass washers from eBay & a model shop. They arrive today :D

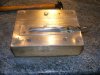
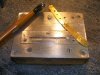
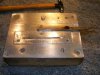
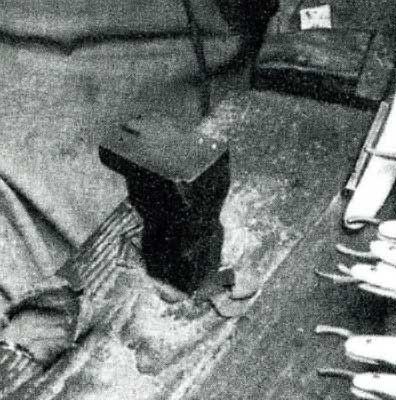
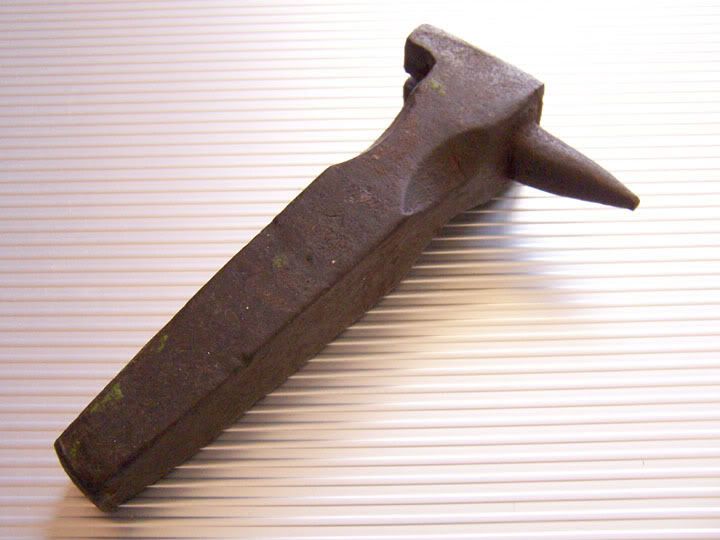
Many of the videos and guides show indents drilled into either vices or the sides of hammer heads which you rest one side of the pin in whilst you peen the other side. My question is - is this really necessary? Or is it just an aid to keep the razor still whilst you peen?

If you've made the dimples, what size of drill-bit did you use?

Cheers

Grant
 
Not necessary, but certainly helpful. You do need to "mushroom" one side of the rode first though, regardless of whether you use the indents or not.
 
I use a nut that has a small dimple in it to do my pinning it is mounted in the middle top of my jig (the holes next to it are used for removing pins) make sure that you use very light taps on the brass rod. Practice on your thumb nail if it hurts you are hitting too hard. Also make sure that you have a polished hammer as it will leave marks in the brass which will need polishing out if you don’t. I have added the photo of my jig to show you what I use.

The brass sheet is 1/64th thick and is used to file the brass rod to the right thickness before I finally revert the razor together. After I have finished I also use it cover the scales while I am buffing the pins.

The jig cost me pennies to make and is the most used piece of kit in my garage. It has got old hdd magnets in it to hold the blade flat while I work. It is that strong the blade never moves no matter how much force I use when had sanding.

Edited: now reads 1/64th Brass Sheet not 1/16th as I originally put sorry.
 

Attachments

  • Picture 4.JPG
    Picture 4.JPG
    183 KB · Views: 83
  • Picture 1.JPG
    Picture 1.JPG
    174.6 KB · Views: 82
  • Picture 2.JPG
    Picture 2.JPG
    170.9 KB · Views: 81
The old Sheffield cutlers and razor-makers like Tom Renshaw, Ernest Mills and Stan Shaw used a small anvil called a 'stiddy' - probably derived from 'steady' - with indents, a cut-out and sometimes holes going right through them:

stiddy.jpg

Above: Tom Renshaw's stiddy, setter-in for Billy Hukin at J & W Ragg

stiddymills.jpg

Above: The great Ernest Mills, Sheffield Little Mester from 1914 - 1982

stiddyshaw1.jpg

Above: The great Stan Shaw's stiddy, Master Cutler and last of the Little Mesters

stiddymine1.jpg


Regards,
Neil
 
Exile said:
I use a nut that has a small dimple in it to do my pinning it is mounted in the middle top of my jig (the holes next to it are used for removing pins) make sure that you use very light taps on the brass rod. Practice on your thumb nail if it hurts you are hitting too hard. Also make sure that you have a polished hammer as it will leave marks in the brass which will need polishing out if you don’t. I have added the photo of my jig to show you what I use.

The brass sheet is 1/16th thick and is used to file the brass rod to the right thickness before I finally revert the razor together. After I have finished I also use it cover the scales while I am buffing the pins.

The jig cost me pennies to make and is the most used piece of kit in my garage. It has got old hdd magnets in it to hold the blade flat while I work. It is that strong the blade never moves no matter how much force I use when had sanding.

That's fabulous! I've seen other designs that people have come up with, but none had the 'slot' in them. I also like the idea of the brass sheet for getting the pin height right. Nice.
 
That really is a nifty piece of kit, Graham! Ingenious!

I didn't see it before - I don't think I logged in before I posted a reply, and some pics don't show up when I'm not logged in.

I have a similar thing, but much simper - it's just two slats of wood about 2" deep by 6" long, held together with wing nuts front and back. I have a slot like your jig in the top, pop the blade in, tighten the wing nuts and hold it in one hand while I sand with the other.

A smaller jig with an end to hook over the workbench (like a jig for sawing), with rare earth magnets and a sheet of replaceable aluminium over it does me to lay the blade flat to get at the hollows. Strong little things, those magnets!

Regards,
Neil
 
Neil I like the idea of the two pieces of wood and wing nuts I am going to make one of those so I can sit in the garden and sand while I enjoy the sun.

Lagaffe you said you got some #0 brass washers from eBay & a model shop. Have they arrived and are the washers all the same size.
I ordered some from the bay of evil and they where all sizes and thickness.
 
Exile said:
Neil I like the idea of the two pieces of wood and wing nuts I am going to make one of those so I can sit in the garden and sand while I enjoy the sun.

Lagaffe you said you got some #0 brass washers from eBay & a model shop. Have they arrived and are the washers all the same size.
I ordered some from the bay of evil and they where all sizes and thickness.

Yep - they all seem to be the same size & thickness: these were the ones I got.

Bloomin' 'eck though - how hard is pinning? The videos & guides make it look easy, but do you think I could get the brass rod to dome/mushroom enough to hold the first side on? No I couldn't. It spread slightly, but not enough to stop the washer popping off. I was at it for 1/2hr, and got it spread just enough to hold it, but once I started on the other side, the washer came off the first one, despite being in my newly-dimpled vice plate. Somehow I eventually managed to get it finished, though it wasn't quite as good as it could have been. The blade isn't as centred as it could be though it's OK.

Is my brass rod just tough, or is there a technique that I'm not getting?
 
lagaffe said:
Is my brass rod just tough, or is there a technique that I'm not getting?

The brass composition plays a huge role in how easy it is to mushroom the rod. I cannot recall off the top of my head what composition is best. That said, it sure sounds like you need a softer alloy. 2.5 hours is much too long to be pounding on a rod. I severely doubt you could be doing it *that* wrong. It isn't hard after all. Not the first part anyway. The only difficulty is not bending the rod or cracking scales when you mushroom the other side. IMO.
 
Wow, that sounds like hard work. Where did you get your brass rod Grant? The stuff from model shops is generally very malleable and only takes a dozen taps or so to thicken up the end sufficiently to stop the washer coming off. There are some specialised alloys which are a nightmare to work apparently, but they tend to be for applications in the aerospace industry and the suchlike. Was there any sign of flaking?

Assuming that what you have is fairly ordinary brass which has somehow become excessively hard (maybe you work hardened it :lol: ), it's easy enough to anneal it. Holding it in the flame of an ordinary butane lighter (a blowlamp would be better) till it goes a dull red then leaving it to cool in its own good time ought to do the trick.

Maybe do a few experiments before you pin the next razor: perhaps you've taken the advice about tapping lightly too much to heart. I think that my peening is fairly gentle, but I'm not altogether sure that I'd like to do the same to my thumb - well not for long anyway. By the way, what size of hammer did you use? (just curious).
 
4oz ball-peen, and the rods came from a model shop.

Looking at the hammer, the ball is actually uneven. Maybe that's affecting things too.

I'll have to play around & experiment before I do my next one. Once I was able to hammer with one side in the dimple, the rod seemed easier to mushroom so maybe I'll try annealing some and see how that goes next time.
 
Not an expert on peening, but I highly doubt the uneven-ness of the ball affects the "peenability" of the brass. I'm sure mine is uneven as all _____, but it does the job just fine. In fact, to get a mushroom to start the pinning, you don't even need a ball peen. The flat end works just as well for that particular task. That's not to say the ball end isn't better, just not necessary.

Didn't think of the annealing bit. Does it soften even the harder alloys? Just wondering.
 
Well, the simple annealing certainly does the trick on common brass, but the more specialised alloys are closer to bronzes which have a bad reputation for workability, so I wouldn't count on it. One job I used to do occasionally was bending 1/4" rod into fairly tight radii for use as heavy duty stays for fall flaps - once annealed you could just wrap it round a wooden former by hand without expending a great deal of effort.
 
This is just my opinion, but have any of you tried to use a small nail punch, the head is a perfect shape with a small round concave in the centre, I use one for putting away small tacks in quadrant moulding around wooden floors, I think I may give my razor i'm restoring a go with this punch when I pin it. It does seem like the perfect tool for the job, maybe i'm about to find out?

Jamie

0033.jpg
 
Back
Top Bottom